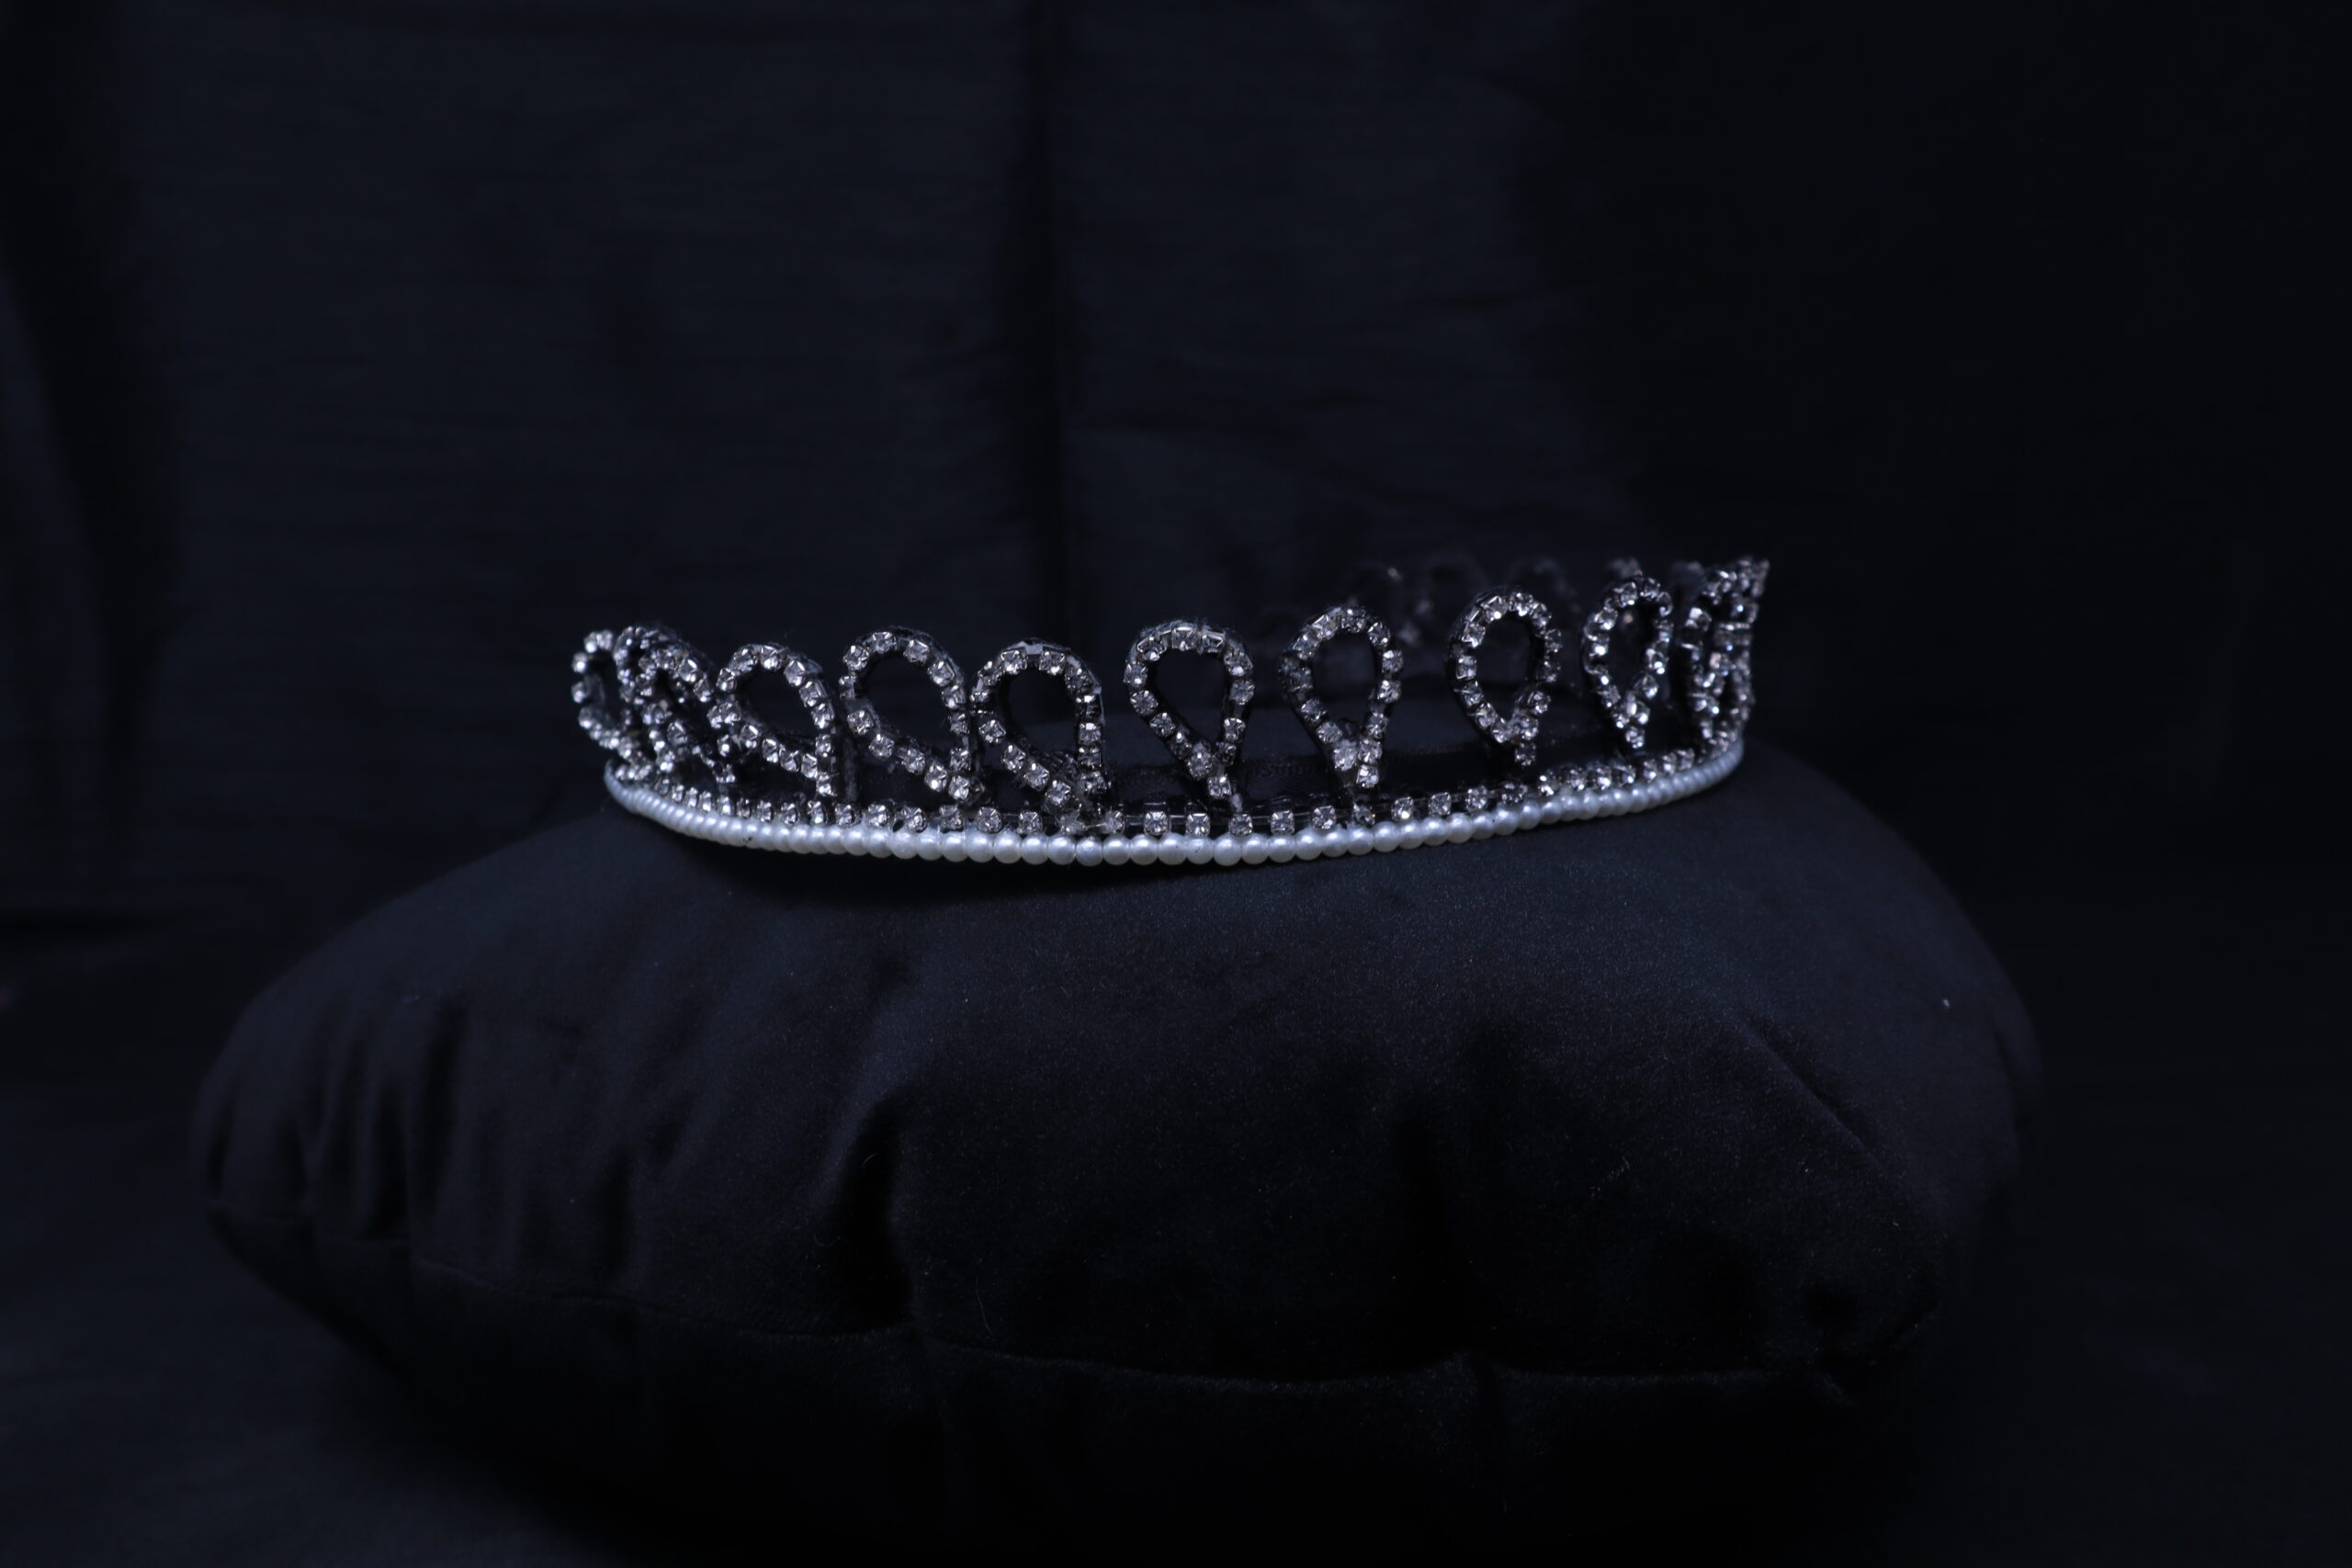
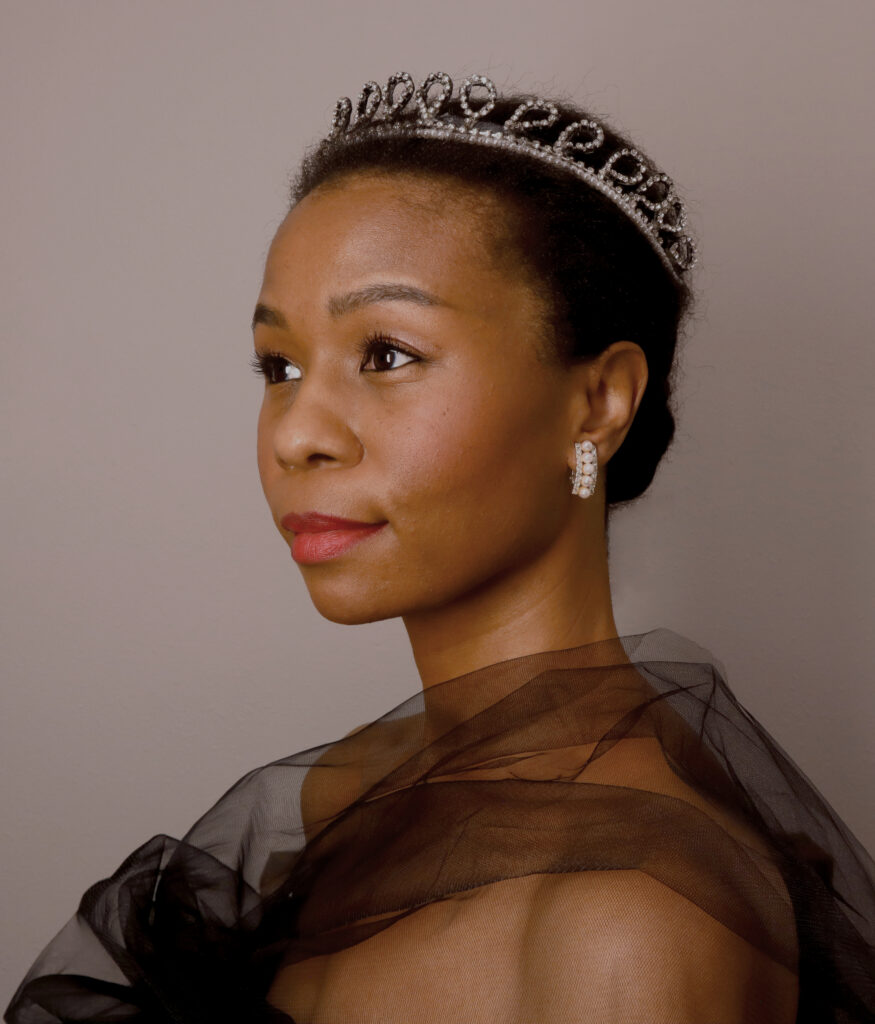
This isn’t quite a tutorial, but I wanted to share a look into the process for what I’m calling a cocktail crown that I made to wear on my birthday last month. I’m defining a cocktail crown as essentially a semi-formal tiara. I’m itching to make more such “cocktail crowns” and will write a complete tutorial when I do.
A few months ago I started playing around again with making headpieces using wirework and some simple soldering. I’m still playing with that but last month while work on my 2026 my birthday ensemble was on hold, I found I stilled wanted to create something to commemorate the occasion on the day. I wondered if I could craft something quickly out of materials I already had on hand. I went into my creative supplies closet and started rummaging through storage bins and bags to see what jumped out at me. I was drawn to a dark color scheme and knew that I wanted to make something that would complement the vintage beaded cocktail dress I planed to wear that night. Luckily for me, I had everything I needed to make something happen.. My research on headpieces has brought me down lots of different rabbit holes over the last few years. At the end of this post is a list of creators who I admire and from whom I borrowed techniques like using stiffened felt and blended them with my own to make this piece.
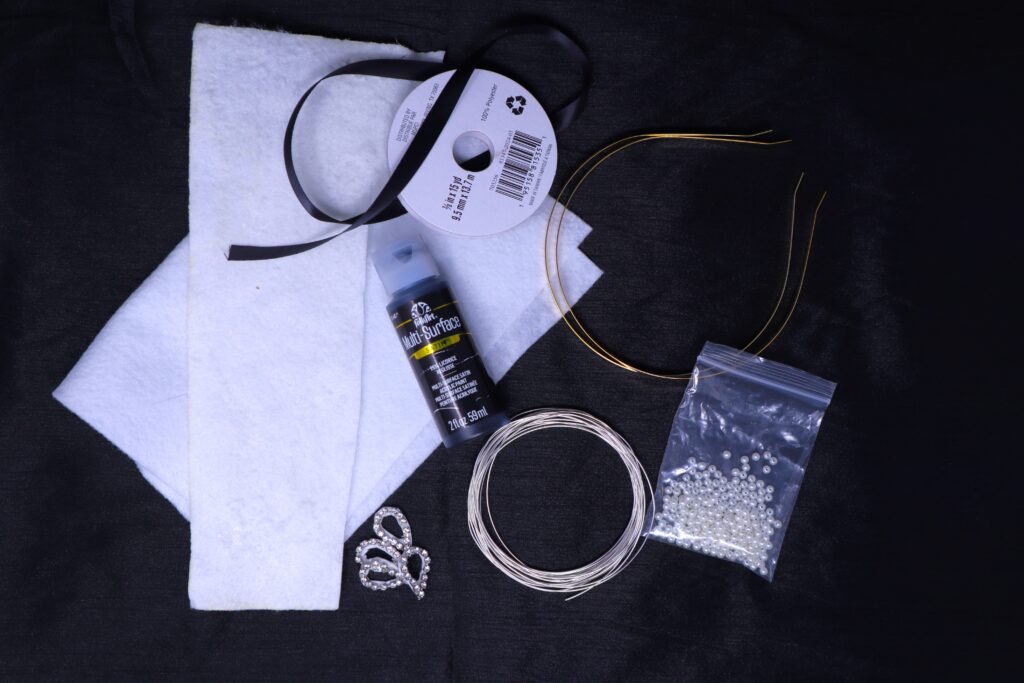
The components I selected are simple: clear rhinestone cup chain, metal headbands, satin ribbon, stiffened felt, faux pearl beads, a couple different gauges of wire, and some black craft paint. All held together with two different kinds of adhesive: Aleene’s tacky glue and a hot melt adhesive.
I thought I might make a pair of earrings first, but when taking into account all the materials I had, I abandoned the earrings for making the crown. I started doing a quick sketch (testing out new to me software) but quickly moved on to executing because the vision quickly became clear in my mind.
While I was using common materials, I wanted the piece to look greater than the sum of its parts. I knew this was possible because a few years ago, when I had the pleasure of seeing the Couture Fantasy exhibition of Guo Pei’s work in San Francisco, I noted how many of the accessories and especially headpieces were made with commonly found materials like copper, resin, and rhinestone. I love how, with careful consideration, the mundane can be made extraordinary. Juxtaposing the common and the rare together is one of my favorite things to do. This fueled me to see what would come about from this particular whim to make a headpiece in just a few hours.
The Process
- Bend the wire headbands to widen their curve
- Wire wrap two headbands together one stack on top of the other to make a wider based to work on.
- Cover the headbands in felt using hot melt glue to secure
- Paint the covered headband black. I used wooden clothes pins to grip the piece while I painted and they also served as a stand to allow the piece to dry on all sides
- Using tacky glue, adhere the satin ribbon across the front of the covered headband
- String pearls onto wire securing each end
- Separate rhinestone chain into equal lengths for the tear drop shapes and one for the length of the headband
- Stiffen the felt with liquid starch and bake until dry in a 350degree F oven ( you can buy stiffened felt, but I was making do with what I had)
- Glue the rhinestone lengths into the teardrop shapes and once dry cut them out with scissors. I used an awl to make a hole in the center before cutting those with scissors.
- Using hot melt glue, adhere the teardrop shapes to the upper half on the outside of the felt crown base beginning in the middle and once reaching the sides angling them with the wide end toward the back
- Using tacky glue, adhere the rhinestone chain and string of pearls to the front. I used wooden clothes pins to hold things in place while I worked and also while the piece dried.
Overall, I had a great time playing in my stash of supplies. Play is so important and it was a reminder to me to do it more often. If I could change anything about the process for this crown it would be to paint the felt before gluing the rhinestone shapes down. I painted afterwards because I wasn’t sure how obvious the white might show through. It dazzled in white ( apologies I have no picture ) but I wanted a more subdued look so opted for black. It was a rush job so it’s not the neatest application, but it was fun! In a perfect world, I would have started with black felt, I was committed to using materials I already had on hand.
I’m happy with how it came out inclusive of all its imperfections. I’ve worn it a few times and it delights me the same way each time. I’m excited to begin working on the next one and I’ll be sure to share it with you!
Truly,
Claire
Additional Resources
- Austin Do (YouTube) – Beautiful recreations of British royal crowns as well as original designs using materials like aluminum drink cans, rhinestones, glue, and brass filigree
- Madame Myriad (YouTube) – Recreations of British royal crowns made with wire, rhinestones, and glue
- Loschy Crowns – Recreations and original designs with inspiration pulled from Disney and other fantasy using materials like stiffened felt, rhinestones, brass filigree, and 3D printed components and glue
Leave a Reply
You must be logged in to post a comment.